Peach Drawing Made Simple: Your Step-by-Step Guide To A Realistic Look
Have you ever looked at a juicy, ripe peach and just wished you could capture its lovely shape and soft colors on paper? Many people feel that way, you know, and it's a pretty common wish for budding artists. Getting that smooth skin, the gentle curve, and that little dimple just right can seem a bit tricky at first. But what if I told you that drawing a truly beautiful peach, one that looks good enough to pick right off the branch, is actually something you can learn to do with just a few simple steps? It’s more accessible than you might think.
Learning how to draw a realistic peach, as a matter of fact, can be a really rewarding experience. It helps you pay closer attention to everyday objects and see the small details that make them special. This easy illustration tutorial, which we're going to go through together, breaks down the whole process. So, whether you're a young artist just starting out or an adult looking for a fun new creative outlet, you can absolutely create a great-looking peach that you'll be proud to show off. It's truly for kids and beginners alike.
We'll walk you through 16 clear steps, covering everything from making the basic peach outline to adding those soft, inviting colors, and even getting the texture and highlights just so. You'll learn to use different shades and, well, some tools to make your peach look ripe and full of life. We've got illustrated examples and easy-to-follow instructions for each part of the drawing process, so you won't feel lost. It's almost like having a friendly art teacher right there with you, guiding your hand. You'll see!
Table of Contents
- Why Draw a Peach?
- Getting Started: What You'll Need
- Your Step-by-Step Peach Drawing Tutorial
- Tips for a Ripe-Looking Peach
- Common Questions About Peach Drawing
Why Draw a Peach?
You might be wondering, why a peach specifically? Well, peaches are, in a way, just wonderful subjects for drawing, especially if you're new to art. Their shape is pretty simple at its core, but they also offer a fantastic chance to practice shading and color blending. That soft, fuzzy skin and the way the light catches it can teach you so much about texture. Plus, they come in such a lovely range of colors, from soft yellows to vibrant reds, giving you a chance to experiment with gradients. It's a fruit that truly invites you to play with light and shadow, you know?
Beyond the technical practice, drawing a peach can also be, well, just plain fun and relaxing. There's something very calming about focusing on a single object and trying to recreate it. It helps you slow down, observe, and appreciate the small details of nature. And when you're done, you have a beautiful piece of art that you made yourself. It's a nice way to express your creative side, and you get to enjoy the process every step of the way. You'll feel a sense of accomplishment, that's for sure.
Getting Started: What You'll Need
Before we jump into the actual drawing, let's gather a few basic supplies. You don't need anything super fancy, just some everyday art materials. Having the right tools, you know, can make the whole process much smoother and more enjoyable. So, let's make sure you're all set to create your very own peach masterpiece. We'll be using some pretty common items that are easy to find.
- Dave Grohl Net Worth 2024
- Cast Of The Comeback Film
- Does Jin Survive In Lost
- Christmas Red Nails
- Emma Friends
- Drawing Paper: Any kind will do, but a slightly thicker paper works well if you plan to use markers or watercolors.
- Pencils: You'll want a regular graphite pencil for sketching (like an HB or 2B) and maybe a harder one (like a 2H) for very light lines.
- Eraser: A good quality kneaded eraser or a plastic eraser will help you clean up mistakes without damaging your paper.
- Coloring Tools: This is where you have options!
- Colored Pencils: Great for layering colors and getting smooth gradients. You'll want shades of yellow, orange, red, and perhaps a touch of green or brown for the stem.
- Crayons: A classic choice for kids and very easy to use for broad color.
- Markers: Can give vibrant, bold colors. Look for alcohol-based markers for smoother blending if you're feeling adventurous.
- Watercolors: For a soft, translucent look. You'll need a brush and a little water.
- A Reference Photo (Optional but Recommended): Looking at a real peach or a clear photo of one can really help you see the subtle details and colors.
Your Step-by-Step Peach Drawing Tutorial
Alright, it's time to actually start drawing! We're going to follow a 16-step process to build your peach from a simple shape to a realistic, juicy-looking fruit. Remember, the goal here is to have fun and learn, so don't worry about making it perfect on your first try. Just enjoy the process, you know? Each step builds on the last, so take your time and follow along. We'll start with the very basic shapes and then add more and more detail.
The Initial Outline
This first part is all about getting the basic form down. Think of it as laying the foundation for your peach. You're just sketching out the general shape, so keep your lines light. You can always erase and adjust these initial marks, you know, so don't press too hard. This is where the magic really begins to happen.
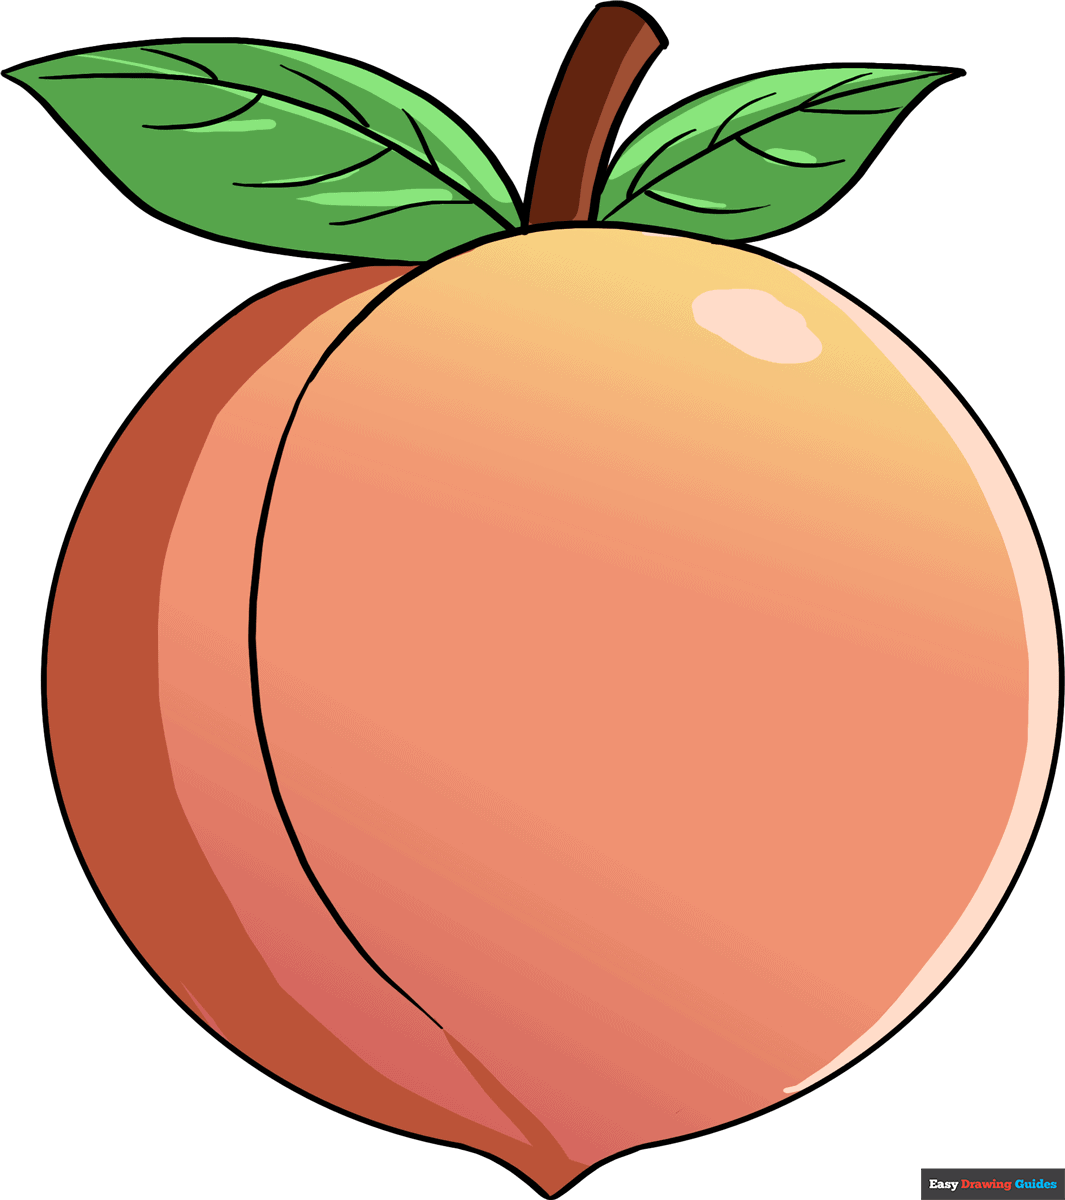
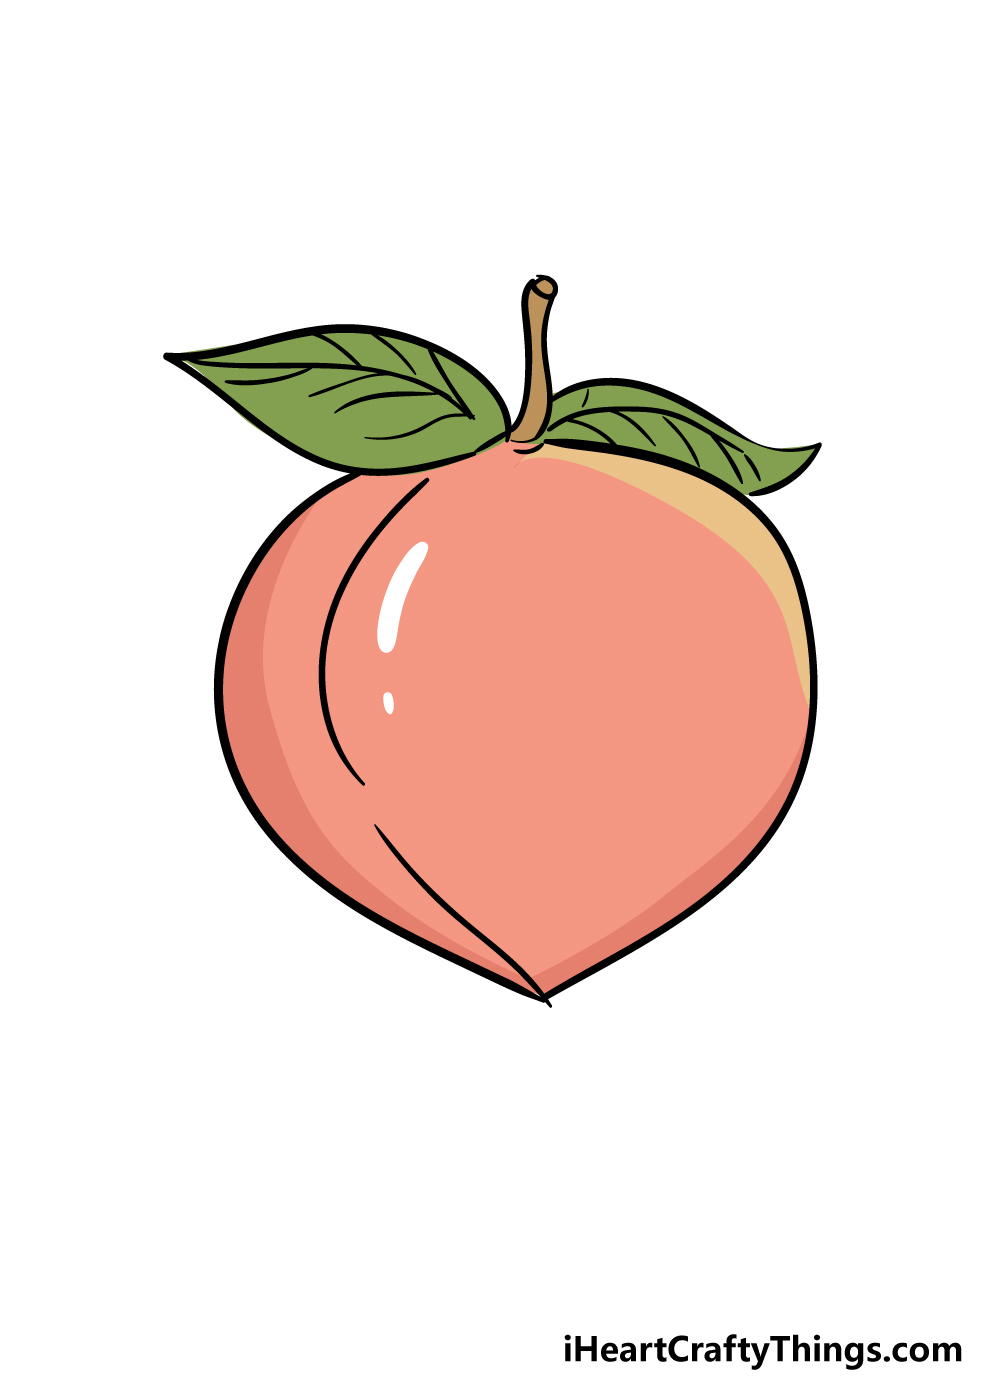
Step 1: The Main Body Shape. Start by drawing a large, somewhat rounded oval shape. It's not a perfect circle; think more like an egg that's a bit wider at the bottom. This will be the main part of your peach. Just a light, loose sketch for now, you know, nothing too defined.
Step 2: The Signature Indentation. Peaches have that distinct groove or dimple on one side. Draw a gentle, curved line down the middle of your oval, slightly off-center. This line should, like, curve inward a bit, showing that natural dip. It's a pretty important feature, actually.
Step 3: Adding the Stem. At the top of your peach, near the indentation, draw a small, short rectangle or a couple of parallel lines for the stem. It doesn't need to be long, just enough to show where it would connect to a branch. You might want to make it just a little bit thicker at the bottom.
Step 4: A Simple Leaf. From the stem, draw a simple, elongated oval shape for a leaf. It can be pointing slightly up or down, whatever looks natural to you. Add a very light line down the middle of the leaf for the main vein. This, like, really helps to give it a bit more character.
Adding Form and Detail
Now that you have your basic outline, we'll start to give your peach some dimension. We're moving beyond just flat lines and beginning to think about how the peach looks in three dimensions. This is where, you know, your peach starts to feel a bit more real.
Step 5: Refining the Edges. Go back over your initial oval shape and smooth out any bumpy or uneven lines. Make the curves a bit more organic, less like a perfect geometric shape. Think about how a real peach, you know, isn't perfectly symmetrical. Just refine it a little bit.
Step 6: Defining the Dimple. Darken the curved line you drew for the indentation a little more. Add a very subtle, soft shadow along one side of this line to make it look like it's sinking inward. This really helps to give it that, like, three-dimensional feel.
Step 7: Gentle Contour Lines. Lightly sketch some very faint, curved lines across the surface of the peach. These aren't for color yet, but rather to suggest the roundness of the fruit. Imagine lines wrapping around the peach. They should be very, very light, almost invisible.
Step 8: Initial Texture Hints. Peaches have that lovely fuzzy skin. You can suggest this early on by adding very tiny, light dots or short, feathery strokes randomly across the surface. Don't overdo it; this is just a subtle hint for later. It's, you know, just a little touch to start.
Bringing it to Life with Color
This is arguably the most exciting part! Adding color will transform your outline into a vibrant, juicy peach. We'll focus on creating a nice gradient, which is that smooth transition of colors. This really makes your peach look ripe and appealing, you know, full of life.
Step 9: Base Color Application. Start with a light yellow or pale orange as your base color. Apply it evenly over the entire peach, not pressing too hard. This will be the lightest part of your peach, the foundation for everything else. You're just laying down the first layer, basically.
Step 10: Introducing the Gradient. Now, pick a slightly darker orange or a light red. Begin applying this color from one side of the peach, blending it smoothly into the yellow base color. The key is to make a gradual shift, so there are no harsh lines. This creates that, like, natural fade.
Step 11: Deepening the Color. Use a richer red or a deep orange to add more intensity to the areas where the peach would be ripest or where the sun would hit it most. Continue blending this into the lighter colors, building up the depth. This is where the color really starts to pop, you know.
Step 12: Coloring the Stem and Leaf. Use a brown for the stem and a green for the leaf. You might want to add a tiny bit of darker brown or black to one side of the stem for a shadow, and a darker green for the leaf's vein. It's, you know, just a little detail that helps.
Finishing Touches and Realism
These final steps are all about adding those little details that make your peach truly shine and look realistic. It's about bringing out the texture, adding sparkle, and making it feel like you could almost reach out and touch it. These small additions, you know, really make a big difference.
Step 13: Adding Highlights. Identify where your light source is coming from. On the brightest side of the peach, use a very light yellow, white, or even just leave a small area of paper untouched to create a highlight. This is where the light hits the peach directly. It's a very, very important step for realism.
Step 14: Deepening Shadows. Use a slightly darker shade of red or a touch of brown or even a very light gray to add subtle shadows to the opposite side of the peach from your highlight, and inside the dimple. This gives your peach more form and makes it look round. It's, you know, what really makes it stand out.
Step 15: Enhancing Texture. Go back to those faint texture hints. Using tiny, light strokes or very small dots with your colored pencils (or a slightly darker crayon), add more of that fuzzy texture. Don't cover the whole peach, just suggest it in certain areas. This is, like, what makes it feel real to the touch.
Step 16: Final Adjustments. Step back and look at your peach. Are there any areas that need a little more blending? Do the colors transition smoothly? Add any final touches, like a tiny bit of darker color for the leaf veins or a subtle cast shadow beneath the peach to ground it. You know, just tweak it until it feels right.
Tips for a Ripe-Looking Peach
Getting that "ripe" look is, like, a key part of drawing a peach. It's not just about the color, but how the colors blend and how you show the light. Here are a few extra pointers to make your peach appear perfectly ready to eat, you know, full of juicy goodness.
- Layer Your Colors: Instead of pressing hard with one color, apply several light layers of different shades. This creates a richer, more complex color that mimics a real peach's skin. It really helps to build up the depth, you know.
- Blend, Blend, Blend: Use a blending stump, a tissue, or even your finger (if using colored pencils or crayons) to smooth out the transitions between colors. A soft, seamless gradient is what makes a peach look truly ripe. It's pretty important, actually.
- Warm Tones Are Key: Focus on warm yellows, oranges, and reds. Avoid too many cool colors unless you're adding very subtle shadows. The warmth is what gives it that inviting, juicy feel. That's, like, a big part of it.
- Subtle Imperfections: A perfectly smooth peach can look a bit fake. Add a few very tiny, almost unnoticeable speckles or slight variations in color, just like a real peach might have. This, you know, adds to its natural charm.
- Observe Real Peaches: Seriously, pick up a real peach if you can! Look at how the light hits it, where the colors change, and what the texture feels like. You'll learn so much from direct observation. It's, like, the best teacher there is.
Common Questions About Peach Drawing
People often have a few questions when they're starting out with peach drawing. It's pretty normal to wonder about certain things, you know? Here are some answers to common queries that might help you on your artistic journey. These are questions we hear quite often, actually.
How do you draw a simple peach?
To draw a simple peach, you really just need a basic rounded oval shape for the body. Then, add a curved line down one side for the signature indentation. A small stem at the top and a simple leaf attached to the stem finish it off. For color, use a light orange or yellow as a base and add a bit of red or darker orange on one side for a simple gradient. That's, you know, the easiest way to start.
What colors do you use to draw a peach?
For a realistic peach, you'll want a range of warm colors. Start with light yellows and pale oranges. Then, introduce brighter oranges and various shades of red, from light to deep, to create that lovely gradient effect. A touch of brown for the stem and green for the leaf are also, like, essential. You might even use a very light gray or brown for subtle shadows. It's all about layering those warm tones.
How do you make a peach drawing look realistic?
Making your peach drawing look realistic comes down to a few key things. First, focus on creating smooth color gradients, blending your yellows, oranges, and reds seamlessly. Second, pay attention to highlights and shadows; a well-placed bright spot and a soft shadow give it dimension. Third, suggest the fuzzy texture with tiny, light strokes or dots. Finally, observing a real peach or a good reference photo is, you know, incredibly helpful for capturing those subtle details. You can learn more about color theory, which can help a lot with realism.
You can learn more about drawing fruit on our site, and link to this page for more beginner drawing tutorials.
How to Draw a Peach - Really Easy Drawing Tutorial

How to Draw a Peach - HelloArtsy
Peach Drawing - How To Draw A Peach Step By Step
