Mastering The Twist Out: Your Guide To Gorgeous Natural Curls Today
Have you ever dreamed of hair that simply springs into beautiful, defined curls without the need for heat? Well, you know, a twist out is a truly wonderful natural hairstyle that can be done using a whole bunch of different ways. It’s a favorite for so many who love their natural texture and want to show it off, really. This style lets your hair shine, offering definition and bounce that feels just right.
You can create a wide range of looks, which is rather cool. From very tight ringlets that coil perfectly, to big, bouncy curls that have a lot of life, or even, you know, those wonderfully chaotic waves that give a relaxed, beachy feel. The possibilities, it seems, are pretty vast, allowing you to change your look whenever you want, which is rather nice.
Learning how to create stunning twist outs is a skill that, honestly, pays off big time for anyone with natural hair. This comprehensive guide will walk you through each step, making sure you have all the tips to get that perfect, long-lasting definition. We’ll cover everything, so you can achieve those amazing results you’ve been hoping for, more or less.
- Wife Naked For Husband
- Scorpio Venus Man
- Olay Eye Moisturizer
- 70 Feet
- How Old Was Mike Vitar In The Sandlot
Table of Contents
- What is a Twist Out?
- Why Choose a Twist Out?
- Getting Started: Prepping Your Hair
- The Twist Out Process: Step-by-Step
- Unraveling Your Masterpiece
- Maintaining Your Twist Out
- Common Twist Out Questions
- Conclusion
What is a Twist Out?
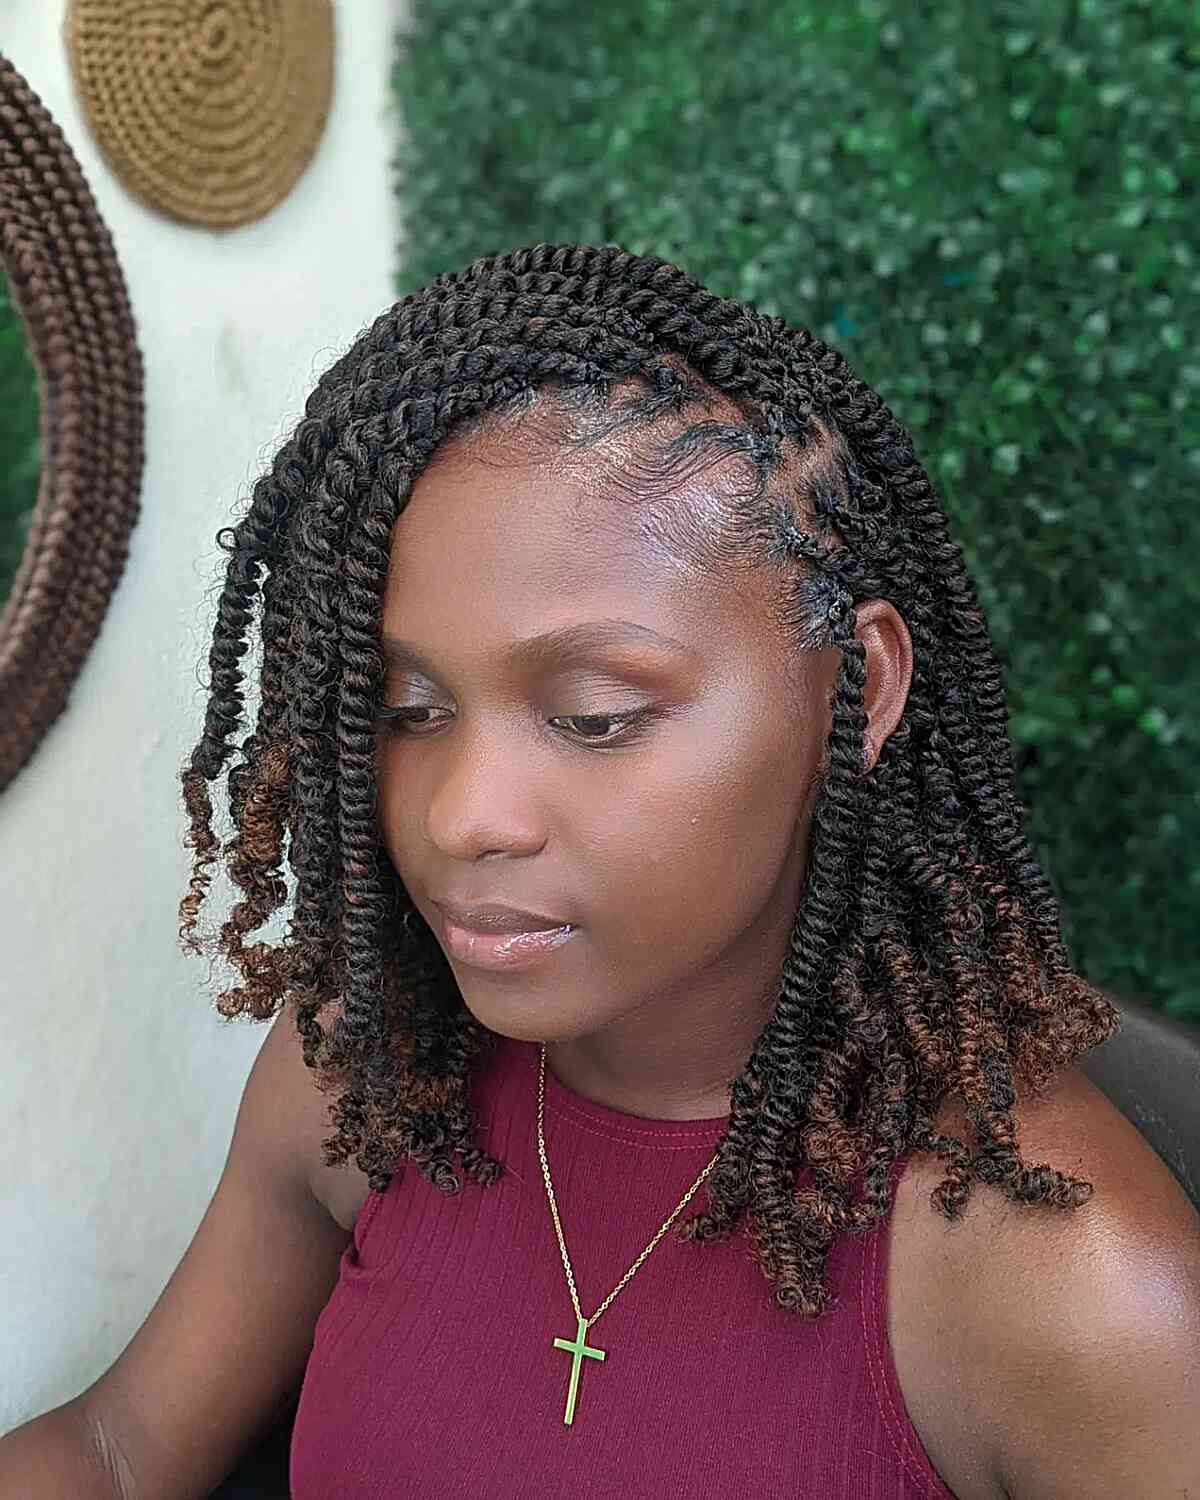
A twist out, you see, is a natural hairstyle where you twist sections of damp hair and then, after they dry, you gently untwist them to reveal a defined curl pattern. It's a rather popular method for folks with textured hair to get beautiful, consistent curls without using any heat, which is a big plus for hair health. The whole idea is to encourage your hair's natural curl to take a certain shape, giving you a lovely, put-together look.
It's a way to enhance your hair's natural wave or curl, giving it more structure and less frizz, which can be a common concern for many. The process involves creating these twists, letting them dry completely, and then carefully separating them. This separation is what makes the magic happen, turning those twisted sections into a full head of bouncy, well-formed curls. It’s a pretty simple concept, really, but the results can be quite striking, you know.
Why Choose a Twist Out?
There are so many good reasons why a twist out might be just the thing for your hair. For one, it’s a very gentle way to style. Since you don't use hot tools, you avoid the potential for heat damage, which, as a matter of fact, can be a real issue for natural hair over time. This means your hair can stay stronger and healthier, which is something we all want, right?
- Martha Stewart Blankets
- 10 Luck 20 Skill
- Ramsey Animal Hospital
- George Clooney And Father
- Emily Osment Friends
Another great thing is the amazing definition you get. If your curls sometimes seem a bit, you know, undefined or prone to frizz, a twist out can really help. It gives each strand a chance to form a clear, pretty curl. Plus, the style can last for several days, especially with a bit of care, meaning less time spent on your hair each morning. It's a rather convenient option for busy lives.
And, honestly, the versatility is a big draw. As mentioned, you can get tight ringlets, big, flowing curls, or even those lovely, carefree waves. It just depends on how you twist and how big your sections are. This means you can adjust your look to fit your mood or the occasion, which is pretty cool. It’s a style that offers a lot of freedom, basically.
Getting Started: Prepping Your Hair
Getting your hair ready is, you know, a really important step for a successful twist out. Think of it like preparing a canvas before painting; the better the canvas, the better the art. Proper preparation helps ensure your curls come out defined, last longer, and look their very best. It's where the foundation for a great style is laid, actually.
Clean Hair is Key
The key is to start with freshly washed hair. This is super important, you see. When your hair is clean, it's free of old product buildup, dirt, and oils that can weigh it down or make it less receptive to new products. Clean hair also tends to absorb moisture and styling products better, which is vital for getting good, long-lasting definition in your twist out.
So, begin with a good shampoo and conditioner. Make sure to rinse thoroughly. Some people even like to do a deep conditioning treatment at this stage, just to give their hair an extra boost of moisture. This step, quite simply, sets the stage for everything else, giving your hair the best chance to shine.
Moisturize and Detangle
After washing, your hair needs moisture, and it needs to be free of tangles. Apply a leave-in conditioner or a good moisturizer. This helps to hydrate your strands and makes the detangling process much easier, too. Use a wide-tooth comb or your fingers to gently work through any knots, starting from the ends and moving up to the roots.
Detangling when your hair is wet and conditioned is less damaging, apparently, than trying to comb through dry hair. Smooth, tangle-free hair will twist more evenly, and that means your twist out will come out looking much more uniform and pretty. It’s a step that, honestly, saves you a lot of frustration later on.
The Twist Out Process: Step-by-Step
Now for the fun part: actually creating those twists! This is where you get to shape your future curls. It's not too hard, really, but taking your time and being a bit gentle will make a big difference in the final look. We'll go through each bit, so you feel confident doing it yourself.
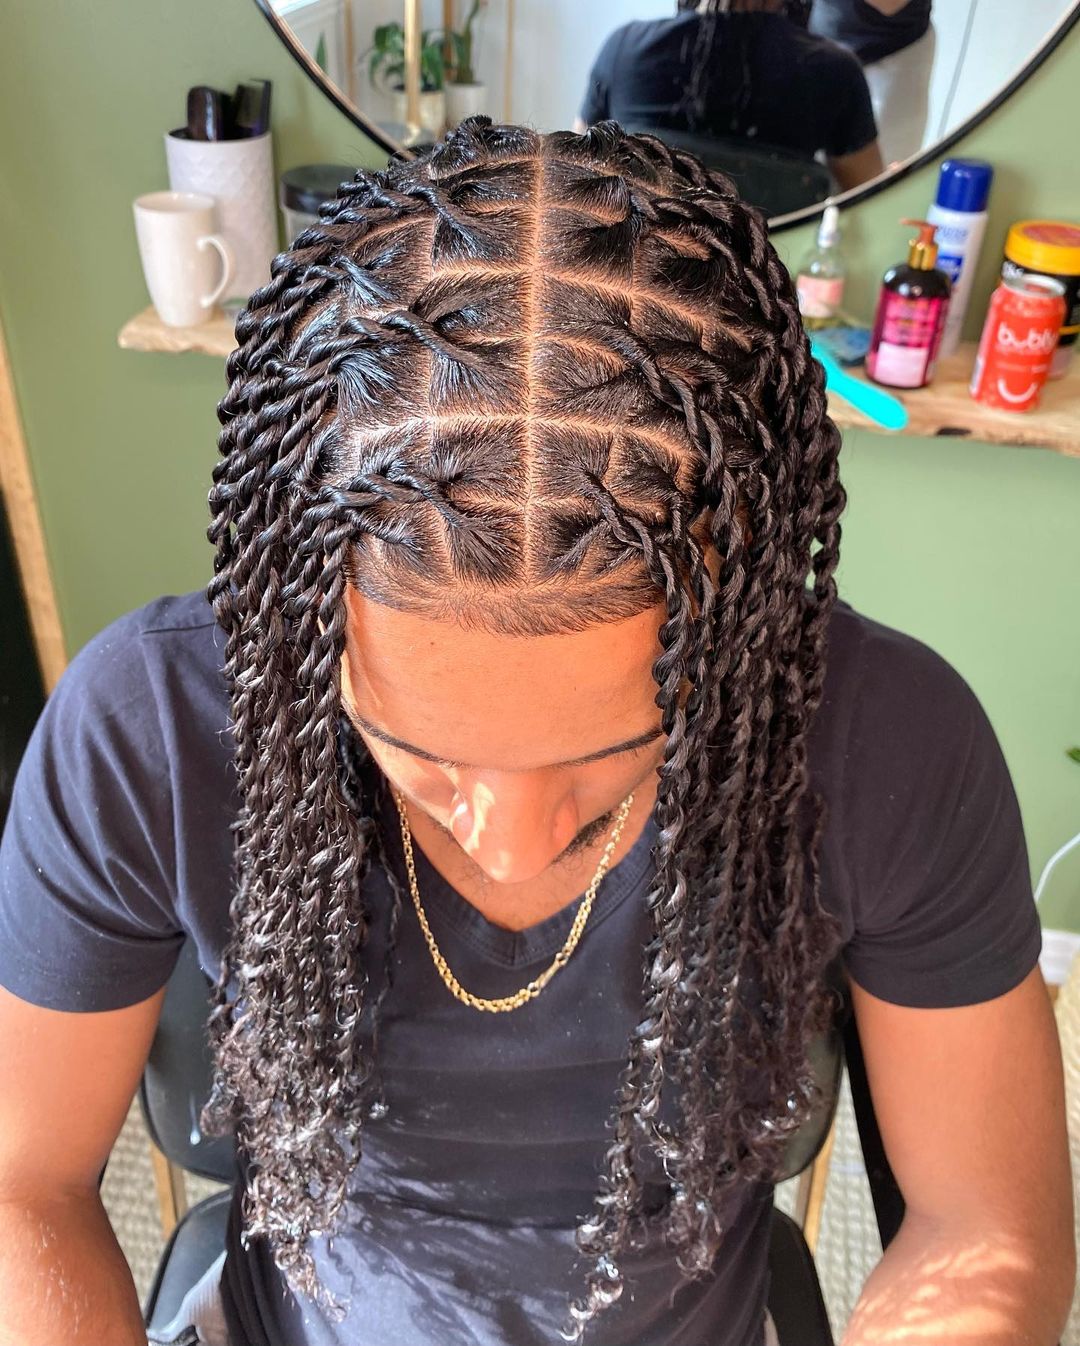
Sectioning Your Hair
Before you start twisting, divide your hair into manageable sections. This makes the whole process much easier to handle and ensures you don't miss any spots. You can use clips or hair ties to keep the sections separate. The size of your sections will, you know, affect the size of your final curls. Smaller sections generally give tighter curls, while larger sections result in bigger, looser waves.
Think about the look you're going for. If you want those tight ringlets, you'll want smaller sections. For large, flowing curls, go for bigger ones. It’s all about what you prefer, basically. Just make sure each section is roughly the same size for a consistent look.
Applying Product
This is where the holding power comes in. To regularly apply oil or holding product to the twists is a very important part of the process. A good styling cream, gel, or mousse will help define your curls and keep them from getting frizzy. Apply the product evenly from root to tip on each section of hair before you twist it.
The right product helps your hair hold its shape as it dries. You might need to experiment a little to find what works best for your hair type, as a matter of fact. Some hair loves a lot of product, while other hair can get weighed down easily. Just make sure you get good coverage, so every strand gets a bit of that curl-defining magic.
Twisting Techniques
Now, the actual twisting! There are a few ways to do this, and each can give a slightly different result. You can create tight ringlets by making very small, two-strand twists. For larger curls, you might use bigger sections or even three-strand twists. And for those chaotic waves, you could try flat twists or even braid-outs.
The basic idea is to take two strands of hair within your section and twist them around each other from the root all the way to the end. Make sure the twists are firm but not too tight, as that can cause tension. Once you reach the end, you can coil the very tip around your finger or twirl it to help it hold. This helps ensure the ends of your hair curl nicely, too.
Letting Them Set
After you’ve created the twists, let them sit. This is perhaps the most important part of the process, you know. Your hair needs to be completely, absolutely dry before you unravel the twists. If you take them out too soon, your curls will likely fall flat or become frizzy, and that's not what we want, is it?
This can take several hours, or even overnight, depending on your hair's thickness and the humidity in the air. You can air dry, or use a hooded dryer on a low setting to speed things up a bit. Sleeping with your twists in, perhaps covered with a satin bonnet or scarf, is a common way to ensure they dry fully and stay protected. Patience here, honestly, is a virtue.
Unraveling Your Masterpiece
Once your hair is completely dry, it's time for the big reveal! This step needs a gentle touch. First, put a little bit of oil, like argan or jojoba oil, on your fingertips. This helps reduce frizz as you separate the twists and gives your hair a lovely shine. It’s a small step that makes a pretty big difference, you know.
Start at the ends of each twist and slowly, carefully, untwist them. Don't pull or tug. As you untwist, you can gently separate each twisted section into two or three smaller curls, depending on how full you want your hair to look. The more you separate, the bigger and more voluminous your hair will appear. Some people like to use a pick at the roots for even more lift, but be gentle so you don't mess up the curl definition.
Maintaining Your Twist Out
To make your twist out last, a little care goes a long way. At night, you should pineapple your hair by gathering it loosely on top of your head and securing it with a soft scrunchie. Then, cover your hair with a satin bonnet or sleep on a satin pillowcase. This helps protect your curls from friction, which can cause frizz and flatten your style, basically.
In the mornings, you might need to refresh your curls a bit. A light mist of water mixed with a little leave-in conditioner can help revive any flattened sections. You can also re-twist a few sections if they've lost their definition. Just remember not to overdo it with products, or your hair might get weighed down. A little touch-up goes a long way, more or less.
Common Twist Out Questions
People often have questions about getting the best twist out. Here are a few common ones, you know, to help you out.
How long does a twist out last?
A twist out can last anywhere from a few days to a week, sometimes even longer, depending on your hair type, how well you prepare your hair, and how you care for it overnight. Hair texture, humidity, and your daily activities also play a part, so, you know, results can vary.
What products are best for twist outs?
The best products tend to be those that offer good hold and moisture. Look for styling creams, gels, or mousses that are made for natural hair. Many people find success with products that have ingredients like shea butter, coconut oil, or aloe vera. It's really about finding what your hair likes, apparently.
Can I do a twist out on short hair?
Absolutely! Twist outs work wonderfully on short natural hair. The technique is the same, though you might use smaller sections and find the twists dry a bit faster. It's a fantastic way to add definition and style to shorter lengths, giving a lot of character, which is pretty neat.
Learn more about natural hair care on our site, and link to this page for more twist out inspiration.
Conclusion
Creating a twist out is, you know, a rewarding experience for anyone wanting beautiful, heat-free curls. From starting with freshly washed hair to regularly applying oil or holding product to the twists, each step plays a part. After you’ve created the twists, letting them sit until completely dry is key for those stunning results. This guide, honestly, gives you the roadmap to achieve those lovely curls and waves.

50 stunning twist hairstyles worth taking screenshots – Artofit
Chunky Flat Twist Hairstyles
25 Types of Twist Braids Hairstyles to Try Now: Pictures & Styling Tips
